
A detailed look at Betty’s full set up.
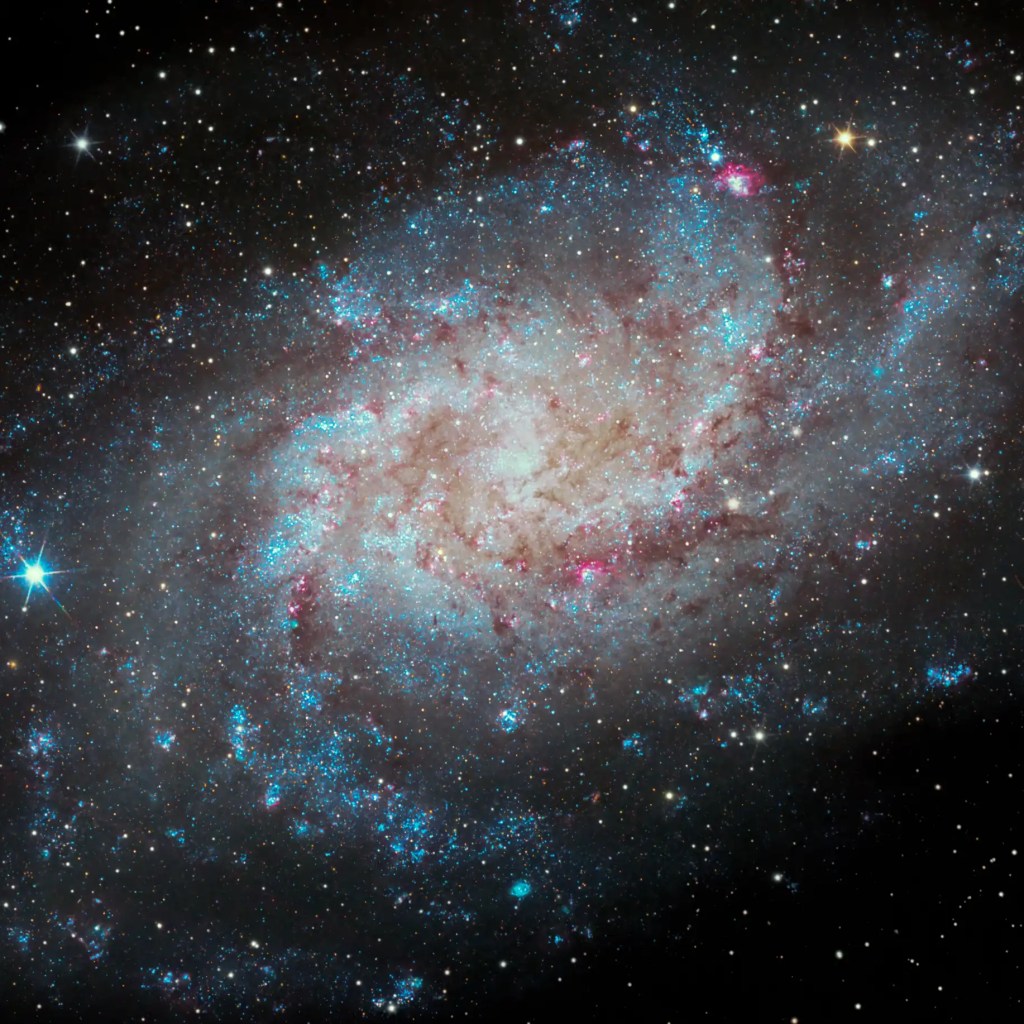
Betty is a fairly modest 8inch Newtonian telescope and yet she is able to stand shoulder to shoulder with professional observatories. Her first proper shot reveals extra-galactic nebulosity in M33. The incredible detail in this image is a testament to both the power of an 8 inch Newtonian and to the quality of cameras (the QHY268m is awesome) and filters and mounts that are now at an amateur’s disposal. (You can watch my adventure up a volcano to capture this image in this video)


Of course it takes more than a good telescope to take an amazing picture. So I want to highlight all the other equipment I used and explain why I needed to use it. Heads up I had to borrow some of this gear for my trip to the Canaries but I will be buying if for myself when funds allow. If you are planning on using my affiliate links to make a purchase then you are welcome to email me with any questions you have about it: [email protected] 😁.

Telescope
Betty is a ‘home built’ telescope so you can’t buy her off the shelf. The nearest commercial telescope are the GSO 8inch F4 scopes which I have dubbed ‘the wow scope’(astrobiscuit.com/best-value-astrophotography-telescope/) because these incredibly good value astrographs use the same mirror that Betty uses.

My affiliate link
(You won’t find a better price)

My affiliate link
(You won’t find a better price)

My affiliate link
(You won’t find a better price)
My affiliate link
(You won’t find a better price)

My affiliate link
(You won’t find a better price)

You can buy this mirror separately for your own Newtonian if you wish. Mirror making expert Terry Pearce checked mine out and gave it a big thumbs up. But be warned you need to hold this mirror very gently with nothing hard touching it or it’ll buckle out of shape.

My affiliate link
(You won’t find a better price)
My affiliate link
(You won’t find a better price)
Betty is however a marginally better than the wow scope. She has thin wire veins holding her secondary mirror. I’m not 100% sure yet that this makes a huge difference to the image but Ceri’s wire system is definitely much easier to collimate. What does make a difference is the fact that she is covered in a layer of carbon fibre so her tube does not flex through the course of the night. The other major improvement is that she is longer. Her extra length allows me to put the secondary mirror further away from the primary mirror. Here the light cone is smaller and I can use a smaller secondary mirror (63mm rather than 70mm). A smaller secondary mirror will make a Newtonian sharper. Not by much but I’ll take it. Normally the problem with having the secondary farther away from the primary is that the light now comes to focus in front of the camera… or at least it would if I wasn’t using the Tele Vue coma corrector.
Camera
The real revolution for amateur astrophotographers are the modern day cmos sensor cameras. Theses cameras are phenomenally sensitive. The QHY268m and ZWO2600mm actually use same APC sized sensor. I have used both. The differences between them are small. The QHY is slightly more complicated but has the ability to get lower readnoise if you fiddle with the settings. This might give you the edge on short lucky imaging exposures but won’t make any difference with regular long exposures. The ZWO is easier to use and set up and it did have a stronger heater to keep the dew away from the sensor but I believe QHY’s latest cameras have now caught up in that regard. Many people like the ZWO because it works seamlessly with ASI air so I have included links here even though I don’t now use it. I did think about suggesting the ZWO duo which has a guiding camera positioned next to the main camera but this extra sensor is actually not that useful if you’re planning on shooting narrowband because the narrowband filters prevent about 97ish% of the light from reaching it and this makes finding a guide star very tricky. Much better in my opinion to have an OAG and guide camera in front of the filter wheel.
QHY268m
- Very Good Value
- 3.76um pixels
- VERY Low read noise 1.08e per pixel
- 28.3mm diagonal sensor sensor
- High sensitivity
- Low Dark Current

My affiliate link
(You won’t find a better price)
My affiliate link
(You won’t find a better price)
My affiliate link
(You won’t find a better price)
ZWO asi2600mm
- 3.76um pixels
- Low read noise 1.3e per pixel
- 28.3mm diagonal sensor sensor
- High sensitivity
- Low Dark Current

My affiliate link
(You won’t find a better price)
My affiliate link
(You won’t find a better price)
My affiliate link
(You won’t find a better price)
My affiliate link
(You won’t find a better price)
My affiliate link
(You won’t find a better price)
Coma Corrector
Televue Paracorr Type 2
Coma is the big aberration that owners of newtonians have to overcome. Tele Vue’s Paracorr type 2 coma corrector is I’ve heard the best coma corrector on the market (see this link to brilliant astrophotographer Lyaphine: ). Thing is it does have a does have a few foibles. It magnifies the image by 15% which is fine for Betty, making her effectively a F4.5 scope rather than an F4 but critically the Paracorr also pushes the focus back by 47mm. This can cause problems because it means the weight of the camera is now 47mm further back than it would be without the Paracorr and most poor outstretched focusers will not be able to handle the resulting extreme amount of torque. Betty however is longer than most scopes. Her natural point of focus without the corrector is in front of the camera. With the coma corrector the point of focus shifts to within the camera’s grasp. So betty will only work for astrophotography with this coma corrector.
- awesome corrector
- pushes focus 47mm outwards which makes it unusable with most Newtonians. There are some alternatives on this page.

My affiliate link
(You won’t find a better price)
My affiliate link
(You won’t find a better price)
My affiliate link
(You won’t find a better price)
Focuser
Baader SteelTrack Diamond NT
The Baader diamond steeltrack focuser is FAR better than the Crayford focusers I used previously. I can’t imagine feathertouch focusers are much better but then again I’ve never used one! This focuser is super smooth and doesn’t tilt even with my 2 kg camera load:
.

My affiliate link
(You won’t find a better price)
My affiliate link
(You won’t find a better price)
My affiliate link
(You won’t find a better price)
Filters
Optolong
I use Optolong LRGB, Ha, Oiii, Sii filters which have performed extremely well. I’ve not had any halo issues and I appreciate the fact that optolong guarantee the throughput which other manufacturers don’t necessarily do. And because I live in London I’ve opted for the 3 nanometer bandpass ultra narrow band filters which are more expensive but we’re much better in highlight pollution in environments (like the big smoke).
.
Fantastic Value

My affiliate link
(You won’t find a better price)
My affiliate link
(You won’t find a better price)
My affiliate link
(You won’t find a better price)
My affiliate link
(You won’t find a better price)
Mount
ZWO AM5
ZWO AM5. The best astrophotography mount on the market: powerful, portable and accurate. It only works well when guiding so don’t get this mount if you don’t do guiding. My full review is here . I also used ZWO’s light weight carbon fibre tripod which is necessary if you’re travelling on a plane. Its incredible how portable this mount is.

My affiliate link
(You won’t find a better price)
My affiliate link
(You won’t find a better price)
My affiliate link
(You won’t find a better price)
My affiliate link
(You won’t find a better price)
My affiliate link
(You won’t find a better price)
Off Axis Guider
ZWO OAG v2
This unit collects a bit of light from the edge of the light cone which is heading towards the main camera and diverts the light to a guide camera. Hopefully this stolen nuggest of light has a star in its field of view (normally with a fast telescope like betty it will have many stars otherwise you have to rotate the guider around the light cone until you find a star) which you can then use via PHD software to guide the mount. A good solid OAG is the most accurate way to guid your mount. This relatively cheap OAG performs very well. I find I don’t need a helical focuser I can get good enough focus by adjusting the guide camera position by hand so why spend more?
.
- Good Value
- only 16.5mm thick

My affiliate link
(You won’t find a better price)
My affiliate link
(You won’t find a better price)
My affiliate link
(You won’t find a better price)
Guide Camera
ZWO ASI 178MM
The ZWO’s asi178mc or asi178mm. This is a very fine lunar, solar and planetary camera can also be used for deep space astrophotography. To be honest the credit for choosing this camera really goes to the roboscope Stellina although I had run a few tests on the imx178 sensor a few years before. The colour version is fantastic but for extra flexibility and performance you’ll need the mono version.
Cooling: I have made a peltier cooler for my asi178. You can see it in action in this VIDEO There was a time when you could buy a cooled version of this camera but sadly no more.
Fantastic Value

- Very Good Value
- 2.4um pixels
- Low read noise 1.4e per pixel
- 14mm diagonal sensor
- Versatil
- mono
My affiliate link
(You won’t find a better price)
My affiliate link
(You won’t find a better price)
My affiliate link
(You won’t find a better price)
My affiliate link
(You won’t find a better price)
My affiliate link
(You won’t find a better price)